


Painting a car used to be something only large auto body shops could do, but modern spray guns and improved paints have dramatically changed the game. Today, anyone with the right equipment and guidance can achieve professional-looking finishes at home. That’s why this comprehensive guide, How to Use Automotive Spray Guns 2026 Step-by-Step Guide to Perfect Car Paints, walks you through each stage from prep to spraying to cleaning.
Whether you're restoring an old vehicle, touching up panels, or starting your first automotive paint job, this article explains exactly how to use automotive spray guns in 2026 with confidence and precision.
Why Automotive Spray Guns Still Matter in 2026
The automotive refinishing industry continues to evolve with new paints, eco-friendly materials, and advanced gun technologies. But despite innovations, the foundation remains the same: a good spray gun, correct technique, and careful preparation.
In 2026, the most searched refinishing queries include:
- “How to use automotive spray guns at home”
- “Best spray gun settings for car paint”
- “HVLP vs LVLP for automotive painting”
- “How to avoid orange peel in car paint”
Understanding the Types of Automotive Spray Guns in 2026
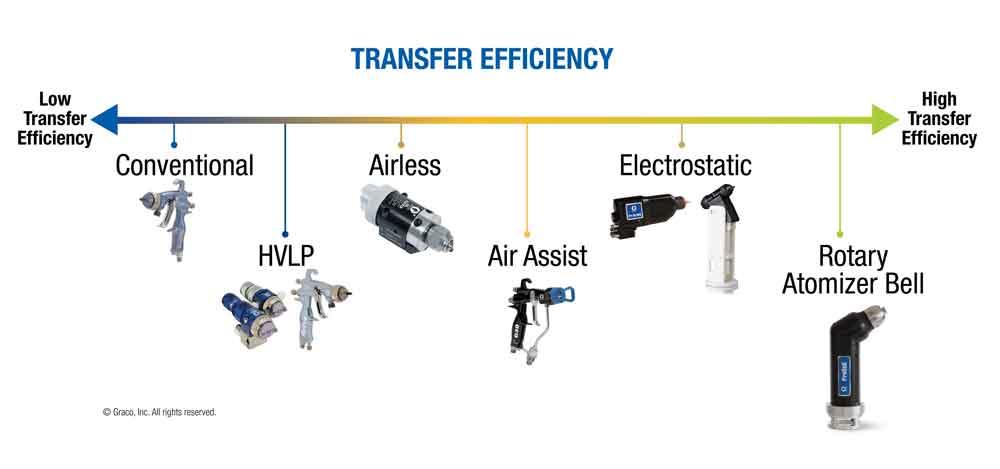
Before learning how to use automotive spray guns effectively, you must understand the two most dominant categories:
1. HVLP (High Volume, Low Pressure) Spray Guns
HVLP guns are the most common choice for automotive basecoat and clearcoat. They consume more air volume but create soft, even atomization, which reduces overspray and gives a smoother finish.
Best for:
- Complete paint jobs
- Basecoat and clearcoat
- Beginners who need easier control
2. LVLP (Low Volume, Low Pressure) Spray Guns
LVLP guns use less air and work well with smaller compressors. They can deliver extremely fine finishes when set up properly.
Best for:
- Small workshops
- Detail areas
- People with limited compressor capacity
If your article or site will later cover product reviews, you can easily link from this section to a page like Best Automotive Spray Guns 2026 as an internal anchor.
Choosing the Correct Nozzle Size for Automotive Painting
One of the most important factors for a flawless finish is choosing the right fluid tip (nozzle) size. Here’s a simplified guide:
| Paint Material | Recommended Tip Size | Why It Works |
| Primer | 1.6–2.2 mm | Thick material needs larger openings |
| Basecoat | 1.2–1.4 mm | Delivers finely atomized paint |
| Clearcoat | 1.3–1.4 mm | Smooth flow for a glossy finish |
| Single-Stage Paint | 1.3–1.5 mm | Balanced flow and coverage |
How to Set Air Pressure on Automotive Spray Guns
Correct air pressure is essential for smooth, even atomization.
HVLP Typical Pressures
- 10-20 PSI at the nozzle
- 25-30 PSI at the gun inlet
- Higher pressures increase atomization but may create overspray
LVLP Typical Pressures
- 10-15 PSI at the nozzle
- Lower inlet requirements than HVLP
- Ideal for small compressors and detailed work
Pro Tip:
Always measure dynamic pressure while the trigger is pulled, not static pressure.
If the pressure is too low:
- Paint spits
- Orange peel forms
- Fan pattern is uneven
If the pressure is too high:
- Excess overspray
- Dry spray spots
- Poor adhesion
Step-by-Step Guide: How to Use Automotive Spray Guns in 2026

This is the heart of the article. These steps walk the reader through the entire painting process with complete clarity.
STEP 1: Prepare the Workspace
A good environment is non-negotiable.
- Work in a well-ventilated area or spray booth
- Keep dust, insects, and moisture away
- Maintain good lighting
- Control temperature between 20–26°C (68–79°F)
If you’re spraying outdoors, use wind blockers and wait for low-humidity days.
STEP 2: Prepare the Car Surface
Proper prep determines 70% of your final finish.
Steps include:
- Clean the surface with wax and grease remover
- Sand with the correct grit (usually 400–600 before basecoat)
- Identify dents and imperfections
- Use body filler if required
- Apply primer and allow proper flash time
- Wet sand primer for smoothness
STEP 3: Mix the Paint Correctly
Each paint brand has a specific ratio for mixing paint, reducer, and hardener.
Typical basecoat mix ratios:
- 1:1 (paint : reducer)
Typical clearcoat mix ratios:
- 2:1 (clear : hardener) + optional reducer
Always consult the manufacturer’s TDS for accurate ratios.
STEP 4: Adjust the Gun Setup
Before touching the car, adjust:
Fan Pattern
- Wide for large panels
- Narrow for small areas
Fluid Flow
- Increase until sputtering stops
- Decrease if the paint runs
Air Pressure
- Adjust based on paint thickness, humidity, and nozzle size
Spray a test pattern on cardboard before every session.
STEP 5: Spraying Technique (The Most Important Part)
Distance
Keep the spray gun 6–10 inches (15–25 cm) from the panel.
Speed
Move at a steady pace — too slow causes runs, too fast creates dry spray.
Overlap
Use a 50% overlap for even coverage and zero striping.
Trigger Control
- Pull the trigger before you reach the panel
- Release the trigger after you move past the edge
This prevents heavy spots at the start and end of each pass.
STEP 6: Apply Basecoat
Most basecoat jobs need:
- 2–4 medium coats
- Correct flash time between coats
- Light "orientation coat" for metallics
The goal is even color, not gloss; clearcoat adds shine later.
STEP 7: Apply Clearcoat
Clearcoat is what gives the glossy, durable finish.
Apply:
- 2-3 wet coats
- Slow, even passes
- Consistent overlap
- Correct flash times
Avoid:
- Overloading (causes runs)
- Spraying too far away (dry spray)
- Pausing mid-panel (heavy edges)
Common Automotive Spray Gun Problems & Fixes
1. Orange Peel
Caused by:
- Low pressure
- Paint too thick
- Gun too far from the surface
Fix:
- Increase pressure slightly
- Add reducer
- Move closer
2. Runs & Sags
Caused by:
- Holding the gun too close
- Moving too slowly
Fix:
- Sand and recoat
- Increase your spraying speed
3. Dry Spray
Caused by:
- Too much distance
- High temperature
- Fast evaporating reducer
4. Poor Metallic Orientation
- Metallics require gentle, even coats.
- Try reducing fluid flow, widening fan pattern, or using an orientation coat.
Cleaning Your Automotive Spray Gun (Critical Step!)

A dirty spray gun = poor results.
Clean After Every Session:
- Empty the paint cup
- Rinse with appropriate solvent
- Disassemble air cap, nozzle, and needle
- Clean with soft brushes
- Lubricate moving parts lightly
- Reassemble and test spray with cleaner
Well-maintained guns last thousands of paint cycles.
Safety Tips When Spraying Automotive Paint
Automotive paints in 2026 still contain chemicals requiring protection.
- Wear a NIOSH-approved respirator
- Use proper eye protection
- Wear gloves and coveralls
- Avoid enclosed spaces without ventilation
- Dispose of paint waste safely
Final Tips for Perfect Car Paints in 2026
- Practice on scrap panels
- Document your gun settings
- Use high-quality reducers and hardeners
- Control temperature and humidity
- Keep the car clean between coats
Conclusion
Learning How to Use Automotive Spray Guns 2026 Step-by-Step Guide to Perfect Car Paints doesn’t have to be overwhelming. By choosing the right spray gun, prepping correctly, adjusting settings properly, and mastering the correct spraying motion, you can achieve smooth, glossy, professional results from the comfort of your garage or workshop.
Product Review : https://wetelluhow.com/top-5-automotive-spray-guns


Add Comment